In the previous lesson the MPLAB Logo was made dynamic by simply changing its visibility. In Part 2, the image is created and destroyed on the fly instead. While Part 1 showed the easy way showed that widgets don’t take up much heap memory space, there may be cases where widgets need to be created and destroyed dynamically instead. One such example would be a calibration screen that is rarely used. In such a case it would be a waste of memory to statically create all the calibration screen widgets and then hide them.
- Make a copy of the ./gfx/apps/aria_quickstart folder on your hard drive.
(Located at .\gfx\apps\aria_quickstart\firmware\aria_qs_e70_xu_tm4301b.X)
Then Load the copied aria_quickstart project into the MPLAB.X IDE.
- Launch the MPLAB Harmony Configurator.
- Open the project’s default saved state:
- Select the Graphics Composer from the MHC Pull-Down Menu which will open a new window for the MPLAB Harmony Graphics Composer.
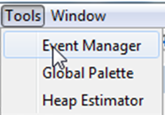
- From the MPLAB Harmony Graphics Composer (MHGC) tools menu, select the Event Manager:
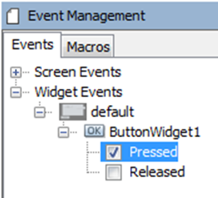
- Next, select the ButtonWidget1 Pressed event:
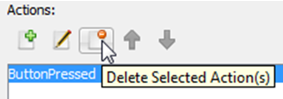
and delete its action:
Later a custom-coded action will be added to the libaria_events.c file.
- Do the same for the Released event.
- Save the updated graphics configuration:

and then close the MHGC window.
- Open the libaria_init.c file and disable the image creation using // CUSTOM CODE flags.
(The file is located in Source Files > config > lcc_rgb565_mxt > gfx > libaria >.)
Note: This is an easy way to keep the image visible in MHGC but prevent it from being automatically created when the application boots.
// CUSTOM CODE - DO NOT CHANGE                                     //New
/*                                                                 //New
    ImageWidget1 = laImageWidget_New();
    laWidget_SetPosition((laWidget*)ImageWidget1, 113, 39);
    laWidget_SetSize((laWidget*)ImageWidget1, 242, 150);
    laWidget_SetBackgroundType((laWidget*)ImageWidget1, LA_WIDGET_BACKGROUND_NONE);
    laWidget_SetBorderType((laWidget*)ImageWidget1, LA_WIDGET_BORDER_NONE);
    laImageWidget_SetImage(ImageWidget1, &NewHarmonyLogo);
    laWidget_AddChild((laWidget*)layer0, (laWidget*)ImageWidget1);
 */                                                               //New
// END OF CUSTOM CODE                                             //New
- In app.h, add an #include to support modifying widgets in app.c
// *****************************************************************************
// *****************************************************************************
// Section: Included Files
// *****************************************************************************
// *****************************************************************************
#include <stdint.h>
#include <stdbool.h>
#include <stddef.h>
#include <stdlib.h>
#include "configuration.h"
#include "gfx/libaria/libaria_harmony.h"
- In app.h, add a Boolean flag to the APP_DATA structure, which will keep track of whether the image is to be seen:
typedef struct
{
    /* The application's current state */
    APP_STATES state;
    bool bShowImage;                                              //New
} APP_DATA;
- Open the libaria_events.c file and make the modifications shown below.
(The file is located in Source Files > config > lcc_rgb565_mxt > gfx > libaria >.)
#include "gfx/libaria/libaria_events.h"
// CUSTOM CODE - DO NOT CHANGE                                    //New
#include "app.h"                                                  //New
extern APP_DATA appData;                                          //New
//END OF CUSTOM CODE                                              //New

// ButtonWidget1 - PressedEvent
void ButtonWidget1_PressedEvent(laButtonWidget* btn)
{
// CUSTOM CODE - DO NOT CHANGE                                    //New
    appData.bShowImage = false;                                   //New
// END OF CUSTOM CODE                                             //New
}

// ButtonWidget1 - ReleasedEvent
void ButtonWidget1_ReleasedEvent(laButtonWidget* btn)
{
// CUSTOM CODE - DO NOT CHANGE                                    //New
    appData.bShowImage = true;                                    //New
// END OF CUSTOM CODE                                             //New
}
- In app.c add this code:
// *****************************************************************************
// *****************************************************************************
// Section: Application Local Functions
// *****************************************************************************
// *****************************************************************************
static void _APP_Image_Create( void )                                      //New
{                                                                          //New
    laLayer* layer0;                                                       //New
    layer0 = laContext_GetActiveScreen()->layers[0]; // Be sure to use correct layer! //New
    // Copied from libaria_init.c:                                         //New
    ImageWidget1 = laImageWidget_New();                                    //New
    laWidget_SetPosition((laWidget*)ImageWidget1, 113, 39);                //New
    laWidget_SetSize((laWidget*)ImageWidget1, 242, 150);
    laWidget_SetBackgroundType(                                            //New
           (laWidget*)ImageWidget1,                                        //New
            LA_WIDGET_BACKGROUND_NONE);                                    //New
    laWidget_SetBorderType((laWidget*)ImageWidget1, LA_WIDGET_BORDER_NONE);//New
    laImageWidget_SetImage(ImageWidget1, &NewHarmonyLogo);                 //New
    laWidget_AddChild((laWidget*)layer0, (laWidget*)ImageWidget1);         //New
}                                                                          //New

static void _APP_Image_Delete( void )                                      //New
{
    laLayer* layer0;                                                       //New
    layer0= laContext_GetActiveScreen()->layers[0]; // Be sure to use correct layer! //New
    laWidget_RemoveChild((laWidget*)layer0, (laWidget*)ImageWidget1);      //New
    laWidget_Delete((laWidget*)ImageWidget1);                              //New
}
In _APP_Image_Create, a call to laContext_GetActiveScreen() issued to get a handle for the layer that will be the parent of the image. Then the image creation code from libaria_init.c, which was commented out there to create the image here.
In _APP_Image_Delete deleting the image with a call to laWidget_Delete will cause an exception. Before deleting the image it must first be removed as a child from its parent (layer0). A call to laContext_GetActiveScreen() is used to get a handle for the parent layer. Then the image is removed as a child of the layer before being deleted.
- Add a static Boolean flag to app.c to keep track of the image state:
bool bCurrentImageState = false;                                           //New
void APP_Tasks ( void )
{
- To APP_Tasks in app.c, add the following code to create and delete the image:
        case APP_STATE_SERVICE_TASKS:
        {
            if ( bCurrentImageState != appData.bShowImage )                //New
            {                                                              //New
                if ( !laContext_IsDrawing() )                              //New
                { // Not drawing, so go ahead                              //New
                    if ( appData.bShowImage )                              //New
                    {                                                      //New
                        _APP_Image_Create();                               //New
                    }                                                      //New
                    else                                                   //New
                    {                                                      //New
                        _APP_Image_Delete();                               //New
                    }                                                      //New
                    bCurrentImageState = appData.bShowImage;               //New
                } //end if ( !laContext_IsDrawing() )                      //New
            }                                                              //New
            break;
        }
If laContext_IsDrawing() returns LA_TRUE then updating the image is postponed.
This prevents APP_Tasks from interfering with the ongoing work of the graphics layer.
- Code modifications are now complete.
Build and run the application. It should demonstrate the same behavior as before, namely pressing the button will cause the MPLAB logo to disappear. Releasing it will cause it to be redrawn.
However, unlike the behavior shown in the previous lesson, where the MPLAB Logo image was made invisible or visible, when the image is deleted the “GFX_Quickstart” label is also redrawn. This is an obvious problem with the current approach.
So, the question naturally arises: Why is this happening?
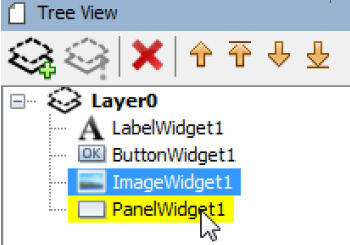
Returning to the MPLAB Harmony Graphics Composer screen, a look at the Tree View panel shows:
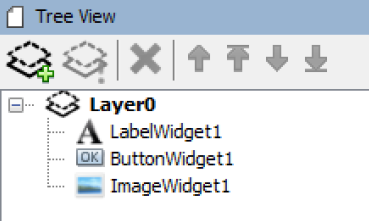
So LabelWidget1 (“GFX_Quickstart”) is a child of the same layer as ImageWidget1 (MPLAB Logo). Under Aria, removing a child from a parent widget triggers a full redraw of the parent widget, which is, in the case of the project, is the base layer (Layer0). Since the base layer is redrawn, all its other child widgets are redrawn as well. That is why LabelWidget1 is redrawn. In fact, ButtonWidget1 is redrawn as well, but this is not noticeable.
To avoid a full-screen redraw, use a panel widget behind the image widget as a the image widget’s parent. That way, when the parent widget (the panel) is marked “dirty” (i.e. needing a redraw) after the child is deleted, only that parent's area is redrawn. Since the parent panel contains only the image, redraws of other widgets are eliminated.
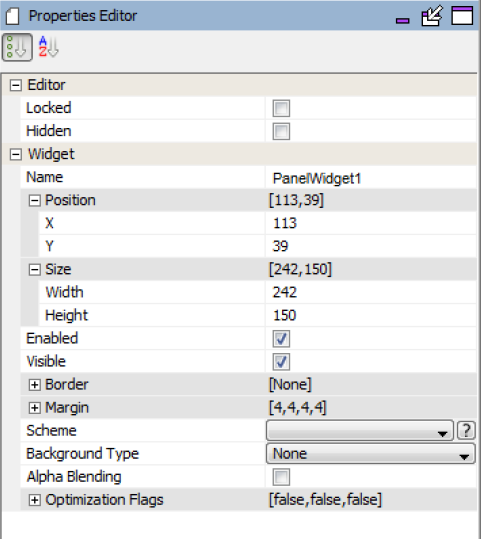
- With the cause of the problem understood, add a Panel widget to the display, sizing it to be just
bigger than the MPLAB Logo Image. Set its Position and Size to be the same as the image
widget and set its Background Type as None:
When complete, MHGC should show:

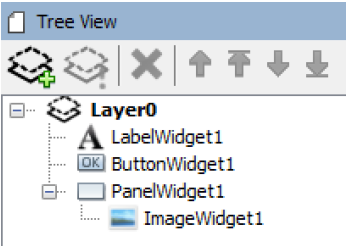
- Next, in the Tree View panel make ImageWidget1 a child of PanelWidget1.
Do this by dragging ImageWidget1 on top of PanelWidget1:
The result should be:
19. Now that ImageWidget1 is the child of PanelWidget1 instead of layer0, remove all references to layer0 and change the parent from layer0 to PanelWidget1:
static void _APP_Image_Create( void )
{
     // Copied from libaria_init.c:
     ImageWidget1 = laImageWidget_New();
     laWidget_SetSize((laWidget*)ImageWidget1, 242, 150);
     laWidget_SetBackgroundType((laWidget*)ImageWidget1, LA_WIDGET_BACKGROUND_NONE);
     laWidget_SetBorderType((laWidget*)ImageWidget1, LA_WIDGET_BORDER_NONE);
     laImageWidget_SetImage(ImageWidget1, &NewHarmonyLogo);
     laWidget_AddChild((laWidget*)PanelWidget1, (laWidget*)ImageWidget1);
}

static void _APP_Image_Delete( void )
{
     laWidget_RemoveChild((laWidget*) PanelWidget1, (laWidget*)ImageWidget1);
     laWidget_Delete((laWidget*)ImageWidget1);
}
20. Save this MHGC configuration and regenerated the project from MHC. Rebuild and run the
project. It should now not redraw LabelWidget1 when ImageWidget1 is deleted.
|
MPLAB® Harmony Graphics Suite
|